Mailing lists allow you to collect up to 200 contacts on one list, which will then be available at one email address. By creating and sending an email to the list address, you’ll instantly reach a whole group of recipients, without having to enter each email address separately. The mailing list is not the same as the group of recipients, i.e. the group created in the e-mail address book, e.g. using Webmail (mail home.pl).
How to create a mailing list?
- Log in to the home.pl Control Panel. Check how to log in to the Control Panel. How to turn on customer panel in English?
- Go to the section: Usługi WWW (WWW services), which is located on the left side of the screen.

- Click the name of the server.
- At the bottom of the screen, locate the Mailing Lists / Listy mailingowe module and click Create / Utwórz to add a new list.

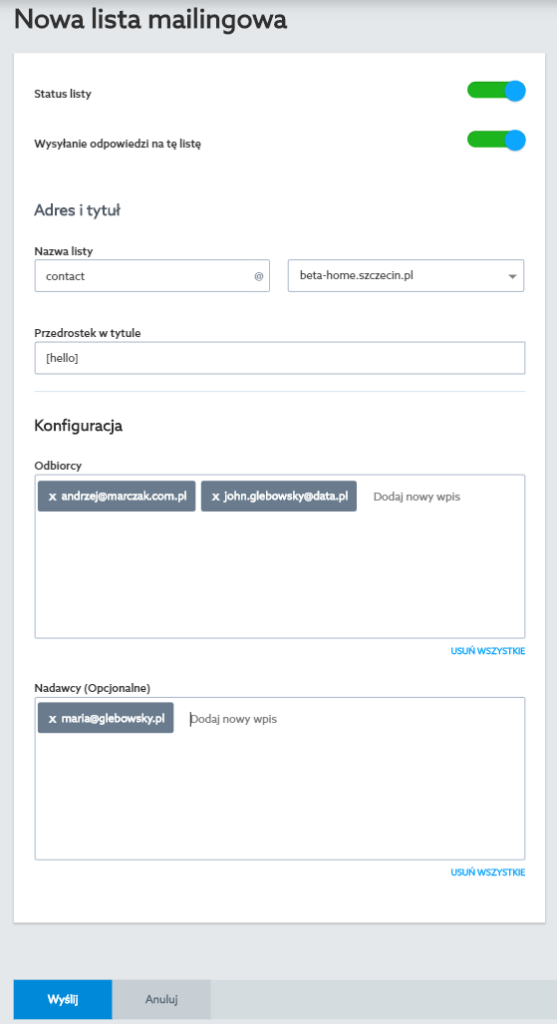
- Fill out the form to create a new mailing list on the server at home.pl:
- Nazwa listy / Mailing list name – enter the name of the mailing list you are creating here. this name will be part of the mailing list address, e.g. the name „management” will create the address management@my-domain.pl
- Domena listy / Domain – here you can define which domain the new mailing list should be assigned to. If you choose the option: All domains, a new mailing list will be created in the addresses of all domains that are assigned to the server. If you choose a mailing list domain, the created mailing list will be available only at the address of the selected domain.Example: The server „server123456” has two domains: „yourdomain.com” and „yourdomain2.pl”. If you create a new mailing list called „management” and select the „All domains” option, then the new mailing list will be available at the addresses of all domains assigned to the server, namely: „management@yourdomain.com” and „management@yourdomain2.pl „.
- Odbiorcy / Mailing list recipients – enter here the email addresses of the users to whom the messages delivered to the mailing list address will be sent (maximum 200 email addresses).
- Nadawcy / Mailing list senders – enter here the email addresses of users who will be authorized to send email messages to the mailing list address (up to 200 email addresses).IMPORTANT! In the „List senders” field you can add e-mail addresses or domain addresses in the format „*@yourdomain.com” which will be authorized to send messages to the mailing list. If the „List sender” field is empty, then each email address will be entitled to send messages to the list.
- Przedrostek w tytule / Mailing list prefix – here you can enter the prefix (max 31 characters), which will be added at the beginning of the subject of each email published on the mailing list.Example: If you enter the phrase: „accounting”, a prefix will appear at the beginning of each email, e.g. „[accounting] An example of the subject of an email sent to the list”. Note that the prefix will be entered in the „[” and „]” brackets.
- Wysyłanie odpowiedzi na tę listę / Responses sent to the mailing list – check this option if you want the replies to e-mails placed on the list to be sent to the mailing list address (all members will see the answer). If this option is not selected, the reply to the e-mail will be sent to the sender of the message (i.e. to the e-mail address of the person who is the author of the message sent to the mailing list).
- Status listy / Mailing list status – specify whether the mailing list should be active.

- Click the Send button. A new mailing list will be created immediately.